
If you’ve been following along this week you will have seen I’ve shared the plans for our house extension along with the first stages of the build. That leads us to part three of my renovation update on the blog – taking us from building the first floor to plastering the spaces and getting down to the finer details.
Things really start to move quickly when you work with efficient, hard working builders! At times it feels like the project has been going on forever and that we might never move back – it sometimes just feels likes a never-ending list of to-dos and decisions – but when I look at the progress as a whole and step back, we really have come far in a short amount of time. It’s been three and a half months and we’re watertight and already thinking about the joinery and decoration. The builders plan (fingers crossed) is to be finished by the end of February, leaving us with the painting and decoration that will comfortably keep us occupied to perhaps Christmas?!
I think after the foundations were dug and the structure was in place, this is when the project started to feel a bit overwhelming. In the early stages, I could leave the project to the builders and have trust they knew what they were doing and didn’t need me.
But then comes a long line of decisions – about plug socket locations, joinery details, bathroom designs and tile layouts. I had been fairly organised, designing electric layouts and creating spreadsheets with every fixture and fitting we needed far before they started on site, which stood me in good stead. If I had left everything to this point, I really would have been tearing my hair out.
It was not each decision that was overwhelming but having to make so many decisions in one time. I’m naturally very decisive so this didn’t phase me too much, but it was trying to remember everything and not drop a ball. Lists became my friends. And waking up in the middle of the night, thinking ‘radiator valves!’ or ‘boiler flue!’. I was paranoid about lead times and the builders telling me off if something was delayed (even thought that something might be out of my control). It’s typical that builders say they don’t want something and you keep asking when they will need it, then suddenly they say, ‘we need it now!!’. Luckily our builders have been very patient and helped us a long the way. Now let’s have a recap.
Architect: Scenario Architecture, Structural engineer: Baker Chatterton, Contractor: Polstar Group


Phase 5 – early December – building up the first floor
Once the steel and ground floor structure was in place, it was time to build up and create the new first floor, which would house our new bedroom and bathroom. I was so excited when I received drone footage from the builders, giving me a birds eye picture of the house extension from above. It all became real then!
The first floor is set back from the ground floor extension, lining up with the neighbours’ houses. It has a small footprint but a mighty impact on the house. It will add an extra bedroom to the house that we will be able to use as a home office – before I was working in our bedroom and my husband was working in my daughter’s room. It will be a relief not to be working in the same room I’m sleeping in.
It was quite surreal to walk into the house and look up to see this whole new space at the top of the stairs (the first floor bedroom and bathroom to be). It was like someone had tacked on a whole extra house to our house. I could walk up the stairs, go through where the old landing window was and walk into a new floor. It didn’t feel like our house at all, it really was transformative.


Phase 6 – December – Insulation goes in and the roof structure is built – and we get a skylight in time for Christmas!
I think these phases felt slower because the first stages – demolition and steelwork – felt so quick and impactful. We could see the space now and had got to know it’s dimensions. Now it was about adding insulation and getting the roof structure on, which takes time especially when it’s intermittently pouring with rain or freezing cold!
We had one slight problem with the insulation. Part L legislation – which dictates the energy-efficiency of new and existing homes – had changed from when the architects issued the drawings to starting work on site. This meant that building control wanted us to increase the thickness of the insulation as what the architect’s had originally spec’d didn’t meet current regulations. This was a bit of a headache, going back and forth with the architect and building control, trying to get the insulation approved without compromising the already tight spaces. It meant we had to add something like 100-150mm on each outside wall. This wouldn’t have been felt on a bigger project, but on a narrow Victorian terraced site, every inch matters. The biggest fallout was with my window seat, making it much tighter than originally planned. My attitude was to roll with the punches: it couldn’t be helped and there was nothing we could do about it but make it work.
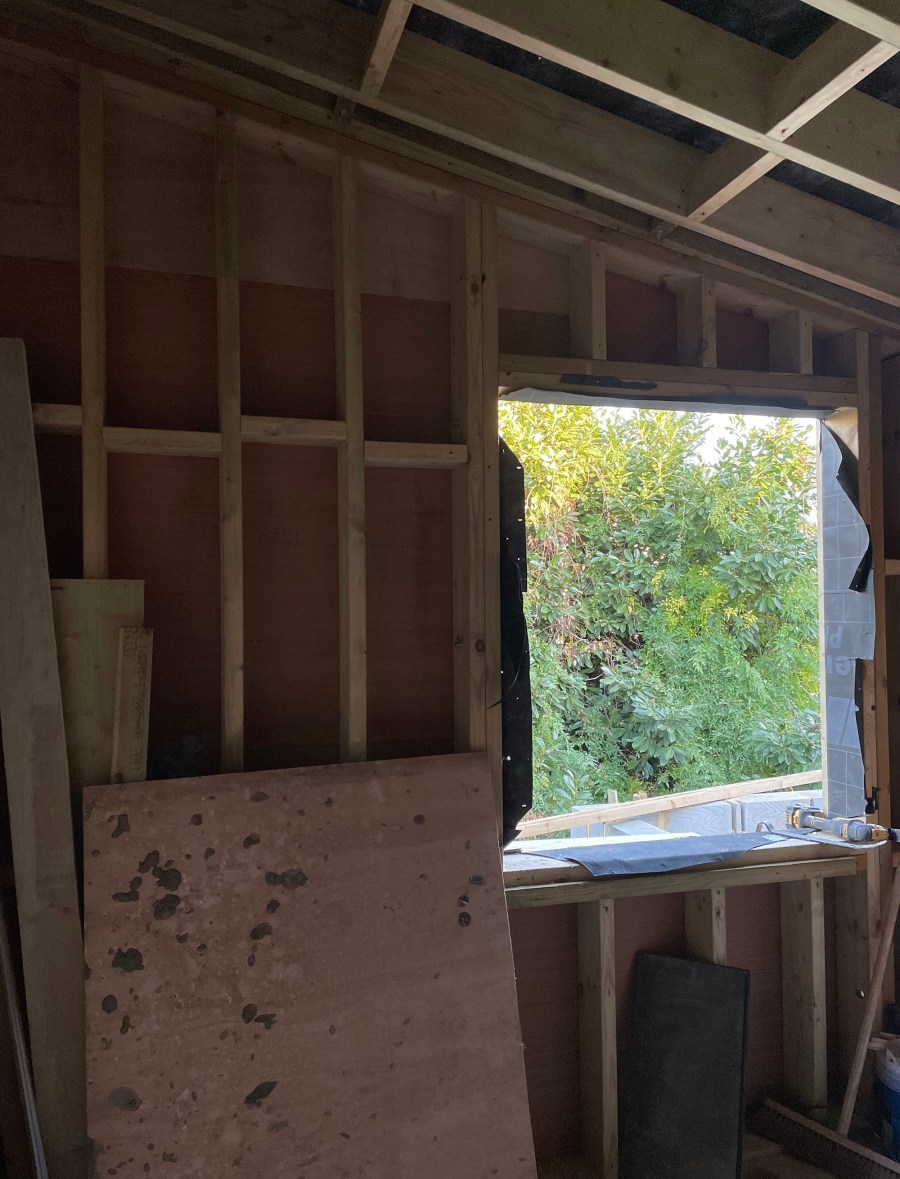
Creating the openings was one of the more exciting developments – especially seeing the new green view out of the first floor back bedroom. We’re in a row of terraced houses facing another row of terraced houses, but because our rear neighbour is a bit lax with his pruning, we benefit from a little private green oasis. Looking out of that window, it’s like being in a treehouse. You don’t feel like you’re in London at all.


By Christmas 2022, we were almost watertight but not quite. We had knocked through from the kitchen to the new extension, making an opening where the old kitchen window was. And we had a rooflight delivered and installed just in time for Christmas, hurrah! That felt like a good milestone to get to before the New Year.

Phase 7 – mid-January – plasterboard and making watertight
Things really started to take shape once they started boarding the rooms up. They start to look like real spaces rather than parts of a messy, fractured building site.
Before the builders started adding the plaster board, we had gone round the site together and confirmed all the locations for the sockets and switches. It helps to mark this on a plan in advance and think about how you’re going to be using the space every day. You can never have too many sockets so I’d say go overboard rather than being restrictive. When we did the first set of renovations when we first moved in, we were left with just one single plug socket in one of the bedrooms and I regretted it ever since!
Around this time the frames for the pocket doors for the bathroom and downstairs loo also went in. I’ve gone for frameless doors without detail or architrave for a really simple, minimalist look.
We also started talking about the first fix for plumbing and where we wanted the heights of the basin and shower mixers. For some things there are standard heights (wardrobe widths, chair heights etc), which you can find on the internet or learn from design books, but for some things like light positions and shower heights, it comes down to the person using that particular thing every day. It can be hard to imagine in a bare space, but it definitely helps to stand in the room and measure dimensions against your own body frame. It can take a bit of trial and error until you work out the perfect fit!


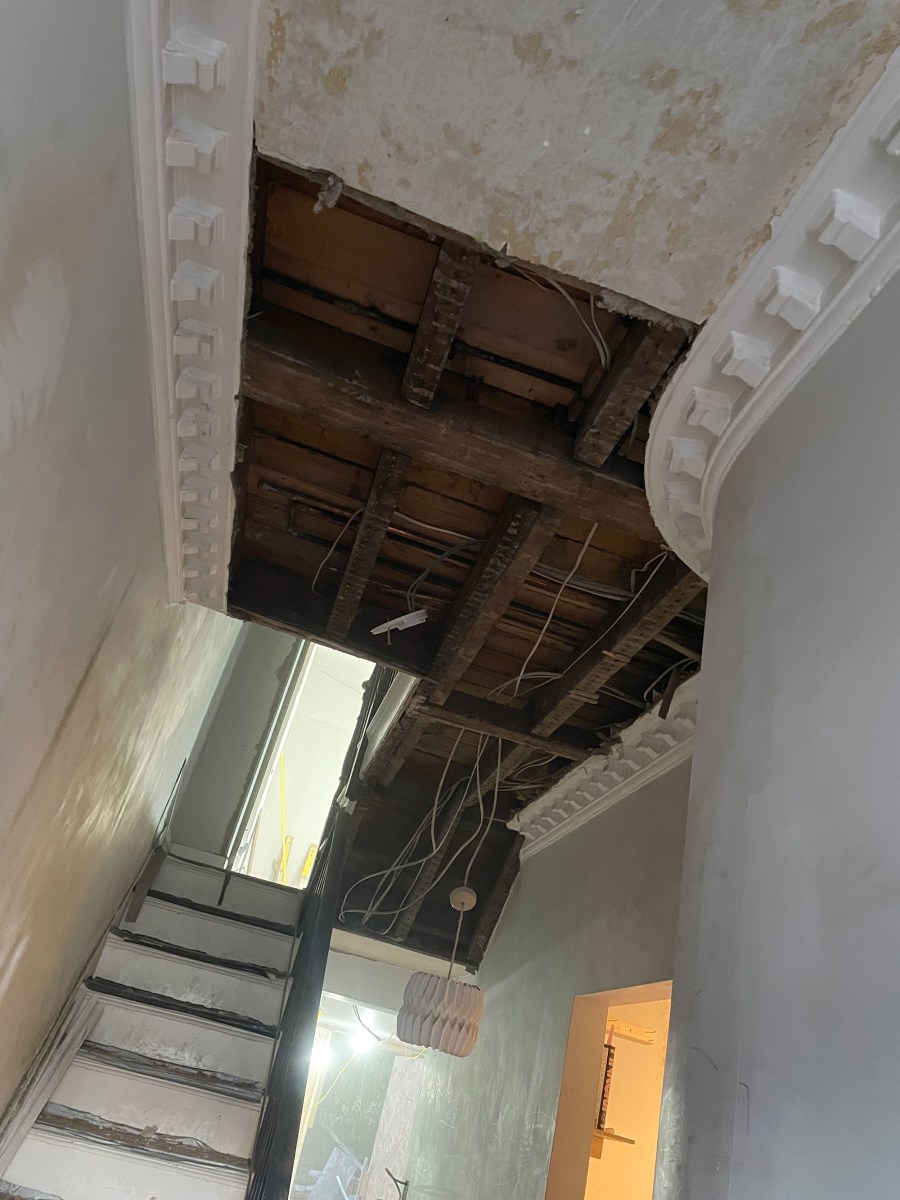
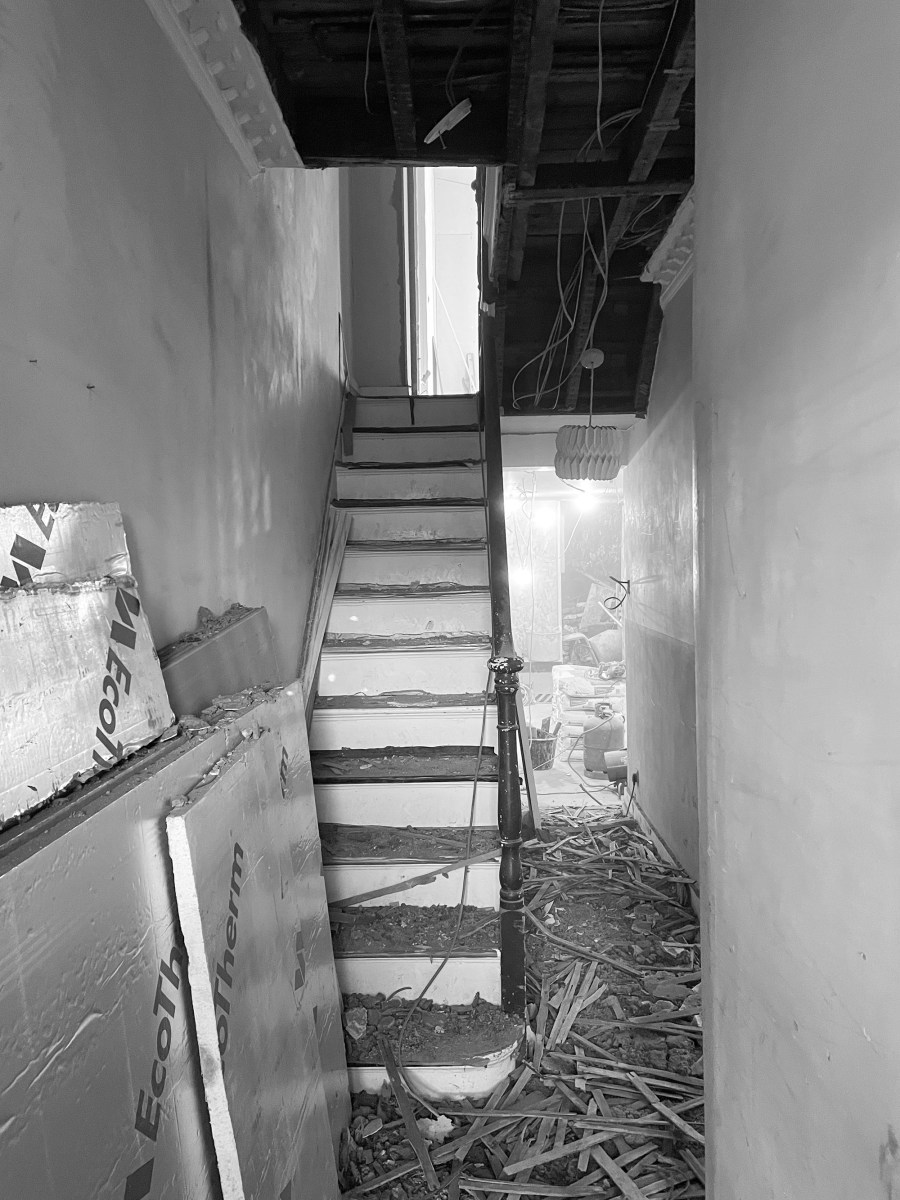
The hallway ceiling comes down
While the builders were doing work to the house, I asked them to remove the old wood chip wallpaper from the hallway ceiling. That wasn’t too much of a problem, but it revealed a very weak, crumbly ceiling below it. The builders recommended removing the worst of it and making good with plasterboard. Fast forward to me standing at the front door, hand in mouth, watching them bring down our hallway ceiling and praying the cornicing would survive.
It’s the only period feature left in the house so it would have been a real shame to lose it. Luckily, cornicing intact and a smooth new ceiling, the project continued with only the slightest of hiccups.


Phase 8 – end of January – plastering and the beginnings of joinery
That brings us to today and the end of January 2023. The new house extension has been fully plastered and we’ve moved onto the decoration and detail. This is where it becomes really exciting for me and where I hope I can flex my interior skills.
When I last visited the joinery was starting to take shape. I’ve designed a four metre long built-in bench that spans the length of one wall, running from a series of cupboards next to the opening to the kitchen, right down to the window seat at the end of the extension. When I started thinking about the extension I knew I wanted a banquette seat for the dining table – I think it just creates a more relaxed style of dining, where you can lean back, slouch and get comfy. I didn’t want a formal dining area, but a relaxed, multi-purpose space that doesn’t dictate how you might use it. I also wanted the window seat at the end to be generous and cosy, so you can really put your feet up and get cosy with a book. So it’s more of a day bed than a window seat.
I hope it’s going to turn out how I imagine it in my head, with off white tongue and groove panelling and a lift up seat with storage for toys underneath.


I feel a lot of pressure to ‘get it right’ and create an Insta worthy interior that will get the seal of approval from everyone. But the only person who can tell you if you’ve got it right is yourself really – it’s your home and it should be designed for you, not anyone else. As long as I’m happy with how the space turns out, it shouldn’t matter what anyone else thinks. I just need to make sure it meets my own (very high) standards! And remind myself that no home is perfect. That’s always a good reminder.


